Adding a settings flyout
In Windows 8.1, application settings are available from any page of a running application by using the settings charm. This brings up a system-provided list of the available settings entry points, with application specific settings at the top (followed by the Windows provided “Permissions” and “Rate and review” items). If the user selects one of these application specified entry points it is the responsibility of the running application to provide the resulting settings UI.
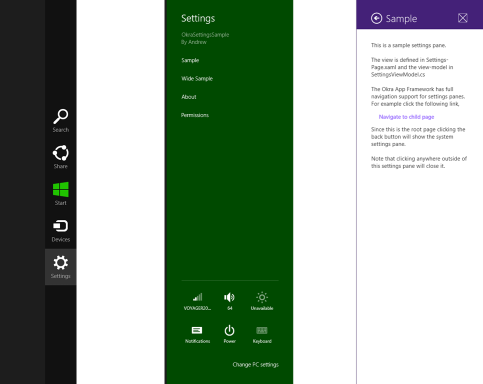
The Okra App Framework makes it simple to add custom settings flyouts, following the same MVVM pattern as any other page. The framework takes care of displaying the correct UI and providing a dedicated navigation stack.
Creating a settings flyout
The Okra App Framework Visual Studio extension provides a dedicated template for creating settings flyouts. From the Visual Studio Add New Item dialog select the Settings Flyout (MVVM) item. This will create a SettingsFlyout derived XAML file along with an associated view-model.
Alternatively you can annotate existing settings flyouts using the usual PageExportAttribute and ViewModelExportAttribute annotations.
[PageExport("MySettings")]
public sealed partial class MySettingsFlyout : SettingsFlyout
{
    ...
}

[ViewModelExport("MySettings")]
public class MySettingsViewModel : MyViewModelBase
{
    ...
}
Registering settings flyouts with Windows
Once you have created your settings flyouts, they must be registered with Windows to be displayed in the system settings pane. You can register application settings in your AppBootstrapper.cs file by following a few simple steps.
- Import an Okra.Navigation.ISettingsPaneManager
- Override the SetupServices() method and attach a handler to the SettingsPane.GetForCurrentView().CommandsRequested event
- In the event handler add each settings item to the args.Request.ApplicationCommands collection in the order you wish them to appear
public class AppBootstrapper : OkraBootstrapper
{
    // *** Imported Properties ***

    [Import]
    public ISettingsPaneManager SettingsPaneManager { get; set; }

    // *** Overriden Base Methods ***

    protected override void SetupServices()
    {
        // Register with Windows to display items in the settings pane

        SettingsPane.GetForCurrentView().CommandsRequested += SettingsPane_CommandsRequested;
    }

    // *** Private Methods ***

    void SettingsPane_CommandsRequested(SettingsPane sender, SettingsPaneCommandsRequestedEventArgs args)
    {
        // The settings names should be localised so create a ResourceLoader to gather these from

        ResourceLoader resourceLoader = new ResourceLoader();

        // Add each settings item in the order you wish them to appear

        args.Request.ApplicationCommands.Add(SettingsPaneManager.GetNavigateToSettingsCommand(resourceLoader.GetString("SampleCommandLabel"), "Settings_Sample"));
        args.Request.ApplicationCommands.Add(SettingsPaneManager.GetNavigateToSettingsCommand(resourceLoader.GetString("WideCommandLabel"), "Settings_Wide"));
        args.Request.ApplicationCommands.Add(SettingsPaneManager.GetNavigateToSettingsCommand(resourceLoader.GetString("AboutCommandLabel"), "Settings_About"));
    }
}
Application commands are provided by an ISettingsPaneManager.GetNavigateToSettingsCommand(…) helper method. This takes two arguments, the first being the name to display in the settings UI, and the second being the name of the page used for the PageExportAttribute and ViewModelExportAttribute annotations. It is good practice to load the display names from a resource file to allow localisation.